Many people are sedentary throughout the workweek and then engage in high-intensity exercise on their days off—earning them the nickname “weekend warriors.” Despite their enthusiasm for exercise, insufficient muscle strength, imbalanced muscle groups, and inadequate warm-ups can easily lead to knee or hamstring injuries, resulting in common problems such as tendinitis.
Proper warm-ups and dynamic stretches before exercise are the most effective ways to protect your body. Simple, effective stretching exercises can improve muscle elasticity and joint flexibility, helping your body better cope with the demands of exercise.
Dynamically Stretching the Superficial Dorsal Line
If the knee joints lack the stability offered by muscle support, strenuous exercise may place added stress on the tendons and ligaments, leading to chronic inflammation or acute strains over time. Therefore, whether running, playing ball games, or training, warming up is the first line of defense against sports and exercise injuries.
Our superficial dorsal fascial line is an extended visible line that stretches from the head, neck, back, buttocks, thighs, calves, all the way to the soles of the feet. We often sit for extended periods, which can lead to imbalances in the front and back muscles. The posterior thighs and buttocks, in particular, often become tight or weak. If this fascial line is not activated before exercise, it cannot properly distribute force during exercise, and the knees become the point of greatest stress. Activation of this line before exercise is crucial to preventing knee and lower limb injuries.
Opening the Shallow Back: 4 Restorative Stretches
The following four restorative moves can be used as “starting stretches” and are perfect before a workout. Hold each position for 20 seconds and repeat them two or three times.
1. Shoulder Press
Step 1: Stand with your feet shoulder-width apart in front of a counter, table, or chair.
Step 2: Place your hands on the table or chair back, and stand back far enough that your elbows straighten and your spine elongates. You'll be looking down at the floor. Let your head relax.
Step 3: Gently press your shoulders up and down.
The shoulder press stretches your shoulders, neck, and spine.
2. Lunge
Step 1: Stand with one foot forward and one foot behind, hip-width apart. Move into a lunge position, keeping your front knee aligned over your ankle. To prevent your knee from moving past the ankle to over your toes, take a wider stance.
Step 2: Gently bounce your torso down and up.
Lunging stretches the iliopsoas and hamstrings. Placing the sole of your back foot at a 45-degree angle can further stretch your inner thighs.
3. Low Lunge
Step 1: In the lunge posture, place the top of your back foot and the top of your back knee on the ground.
Step 2: Keep your upper body straight and press your hips down.
Step 3: Gently bounce your torso down and up.
The low lunge stretches your iliopsoas and can help relieve hip stiffness from prolonged sitting.
4. Lunging Forward Bend
Step 1: From a low lunge, place the toes of your back foot on the ground with your heel up.
Step 2: Straighten your front leg and lean forward, keeping your body as close to your thigh as possible.
Step 3: Gently bounce into the hip joint.
Forward bending primarily stretches the hamstrings. Beginners can bend their knees slightly to gradually loosen the fascia.
Awakening Joints and Muscles: 3 Tips for Activating Elasticity
The root cause of many sports injuries is rushing into explosive power training before the muscles are fully ready. Try the following three exercises to improve blood flow and activate the deep stabilizing muscles.
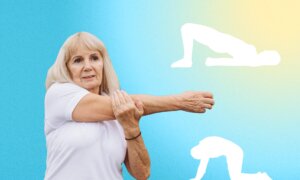
1. Dynamic Squat
Step 1: Stand with your feet shoulder-width apart and your toes pointed outward.
Step 2: Squat down and grasp your ankles with both hands.
Step 3: Lift your hips into a forward fold then return to the squat position.
Step 4: Continue up and down.
Dynamic squatting flexes your knees and stretches your hamstrings, helping to improve blood circulation.
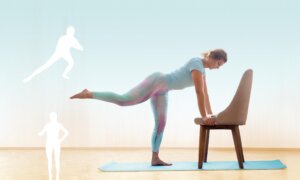
2. Leg Swing
Step 1: Stand on one leg while holding onto a wall or the back of a chair, with the other leg straight.
Step 2: Swing your leg forward as high as you can and then backward.
Step 3: Repeat on the other leg.
The leg-swing exercise activates the hip joints and increases hip and leg flexibility.
3. Heel-Lifts
Step 1: Stand on your toes while holding onto a wall or the back of a chair, with your weight evenly distributed across all five toes.
Step 2: Bring your heels down and then back up.
Step 3: Continue the up and down motion.
Heel lifts strengthen foot and ankle stability while developing core strength.
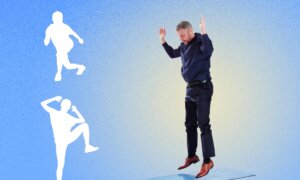
Getting Into Motion: A One-Trick Glute and Leg Workout
After all the stretching and activating, it is time to add squat jumps for a strength challenge. This multi-joint exercise combines explosive leg power with a shallow back stretch. It serves to improve both muscle elasticity and strength, helping your hips and legs quickly transition into athletic readiness.
Step 1: Stand with your feet shoulder-width apart and hands in front of your chest.
Step 2: Squat until your hips are knee height.
Step 3: Engage your core and jump upward, as you swing your arms back, landing lightly on your feet and returning to the squat position.
The key to squat jumps is not the height you achieve, but rather the control of movement. Ensure your knees are aligned with your toes and land with a slight bend to absorb the impact.
Evaluating Your Warm-Up Readiness
How do you know if your warm-up is adequate? You can assess it with the following two exercises. Passing both indicates your major muscle groups and joint mobility have been activated, and you can move on to your actual training phase. Otherwise, if you still feel tightness or discomfort, repeat several more rounds of the stretching and activation exercises.
1. Squat Test
Step 1: Stand with your feet shoulder-width apart, toes pointed outward, and knees aligned with your toes.
Step 2: Lower your hips into a squat.
Step 3: Continue moving into and out of the squat.
If you still feel any clicking or stiffness in your joints when you stand up from the squat, you are not sufficiently warmed up.
2. Side Lunge Test
Step 1: Stand with your feet wide apart and forward.
Step 2: Move sideways to the right and lower into a squat keeping your left leg straight.
Step 3: Return to the center then move to the left, keeping your right leg straight.
Step 4: Continue side-to-side.
If you can successfully complete a side lunge, your muscles are fully engaged now.
While weekend exercise can help make up for a lack of daily activity, skipping a warm-up routine could significantly increase your risk of injury. Through the three steps of stretching, activating, and exercising, you can gradually awaken your body and activate the fascial lines, allowing it to better cope with the challenges of exercise and helping you genuinely enjoy a safe and effective exercise on your “days off.”