I have a confession to make: I wake up with morning stiffness these days. It’s not yet a major concern, and I wake up early enough to do some stretches to safely get my day going. I’m in good company. Millions of people wake up with stiffness—you don’t even have to be old to experience stiff joints and muscles in the morning. Add in medical considerations such as arthritis, and morning stiffness can be profound.
Stiffness doesn’t always get all the credit it deserves for being a troublemaker, but it is unfortunately excellent at limiting our safety and independence in functional tasks and self-care activities, and can also put us at risk of muscular sprains and strains or outright falls that can cause severe injuries.
Thankfully, there’s plenty we can do to eliminate or reduce stiffness. A simple regimen of morning exercises can help us warm up, limber up, and get ready for the day.
6 Exercises to Help Make Grumpy Morning Muscles Happy
A few simple joint warming exercises can help you arise and shine. The following exercises have a proven track record of stretching stiff muscles. I’ve provided a variety of exercises to address different body areas and provide a more complete workout when performed concurrently.
These exercises work well for my patients. However, I suggest that you discuss them with your medical care provider to ensure that they are right for you.
1. Clamshell/Reverse Clamshell
Clamshells are a great way to get your hips moving more easily before you even get out of bed. All you need to do is roll on your side and start moving.
Step 1: Roll onto your left side and place one leg on top of the other, with your knees and hips bent to approximately 45 degrees. The exact degree of hip and knee flexion isn’t absolutely critical, and I find that moderate flexion works for many people—myself included.
Step 2: Slowly lift your right knee as far away from your left knee as possible. Don’t move any other part of your body, just your right leg.
Step 3: Once you have moved as far as you can, return your right leg to the starting position and repeat the movement.
Step 4: Bring your knees together and hold them there as you reverse the movement by moving your feet as far apart as you can. Keep the movement clean, only moving your upper leg as far as you comfortably can.
Step 5: Moving your leg up as far as you comfortably can and then back down counts as one repetition. Try 20 repetitions with your right leg, then roll onto your right side and repeat with your left leg for both knee movements.
Modifications: Only rotate your legs in both directions as far as you comfortably can, especially when you first start moving. As you warm up, you can often move farther.
Why I Like It: Clamshells and reverse clamshells warm your hips up before you even get out of bed. They are quite effective—and easy to perform.
2. Open Book
While we’re lying on our sides, let’s add an exercise to loosen up our shoulders and spine. The movement also provides a deep stretch to your pectoral muscles.
Step 1: Lie on your left side with your legs side-by-side and your hips and knees bent to approximately 90 degrees. Bring your arms up to 90 degrees of flexion, extend your elbows all the way out, and place your palms together.
Step 2: Keeping your elbow straight, slowly swing your right arm up toward the ceiling in an arc, and continue as far back as you can. Rotate your trunk to follow the movement, and keep your nose pointed at your hand as you move.
Step 3: Once you’ve moved as far as you can, hold for approximately five seconds before returning to the starting position.
Step 4: Moving as far as you can, then back, counts as one repetition. Try to perform 15 repetitions on each side.
Modifications: If you can’t swing your arms very far, just swing them as far as you can. You will gain a greater stretch over time.
Why I Like It: The open book is a big, full stretch for your pectoral muscles. It also provides excellent spinal mobility.
3. Shoulder Circles
I really like shoulder circles—they can be done sitting up in bed, or once you’ve stood up. They’re simple to perform and highly effective, and get those shoulders moving. I often have patients perform this exercise because it minimizes their complaints of pain and stiffness, and fools them into thinking that I’m not the mean ol' therapist that I am.
Step 1: In a sitting or standing position, let your shoulders hang down to your sides, ensuring that you have enough space to move them effectively.
Step 2: “Draw” circles with your shoulders. It can help to imagine little pencils attached to your shoulders that you use to draw the largest circles that you can. It can also help to initially perform this exercise in front of a mirror so you can see what you’re doing rather than trying to feel your way through.
Step 3: Slowly move your shoulders in one direction for approximately 30 seconds, and then reverse course and move in the other direction for another 30 seconds.
Step 4: Performing the movement in both directions for 30 seconds counts as one set. Try to perform three sets.
Modifications: Can’t draw very large circles? That’s OK, just draw the largest circles that you can.
Why I Like It: Age and modern technology often leave many of us with stiff shoulders. Moving them in circles gets everything in the shoulders moving, keeping them limber and ready for duty.
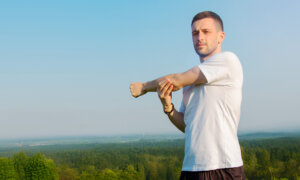
4. I-Y-T Exercise
There are many alphabet exercises: YTW, YTWL, YL, ITWY, and EIEIO, to name a few. OK, just kidding about that last one. They all involve moving your body into letter shapes. Getting your arms going before you get your day going is a wonderful way to prepare them for anything that comes your way.
Practice Tip: You can perform these movements with or without weights.
Step 1: Sit or stand upright, with your shoulders back, your back straight, and your head up. I find it easier to perform these activities in standing, because it gives me more room to move.
Step 2: Place your hands close together in front of you, palms facing toward each other. You can either use weights or perform them empty-handed.
Step 3: In a three-part movement, move your arms into the form of an I, followed by a Y, and then finally a T.
Step 4: First, lift your arms straight up in front of you with your elbows straight, moving them as high overhead as you can for the I position, then move back to the starting position.
Step 5: Next, keeping your elbows straight and your palms facing in, lift your arms into a Y position, then lower them back down.
Step 6: Finally, lift your arms straight out to the sides in a T position before lowering them back down. Going through all three of these movements is considered one set. Try to perform 12 total sets.
Modifications: If you can’t perform overhead movements, just perform the movements until your arms are straight out. If you would like to add a challenge, hold a moderate weight in each hand.
Why I Like It: The I-Y-T exercise goes beyond shoulder circles to engage the neck and upper shoulder muscles.
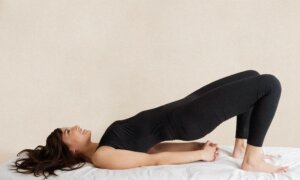
5. Box Draw
Oh, those tight necks! It’s a common complaint among my patients, and something I’m always prompt to address before we get into the meat of the therapy session. I do it myself in the morning to avoid the dreaded “crick” in the neck.
Step 1: Sit or stand with good posture. Slowly point your nose up as far as you can. Imagine you can draw with your nose, and draw the largest square or box you can, moving clockwise for 30 seconds, then reversing direction for 30 seconds.
Step 2: Slowly draw a box pattern for 30 seconds in each direction to count as one set. Try to perform three total sets.
Modifications: Only draw as large a box as you comfortably can.
Why I Like It: The box-drawing exercise is very effective and safe for loosening the neck.
6. Neck Glides
Neck glides complement the box drawing exercise. Where the box draw exercise tends to center on the upper cervical spine, the neck glide effectively adds lower cervical movement. I think that you’ll like what it does for you.
Step 1: Sit or stand upright, with your head straight forward.
Step 2: Glide your nose straight forward as far as you comfortably can. Be sure to keep your head level as you do. Hold the forward position for three to five seconds before returning to the start position. After this, move your head straight back as far as you comfortably can and hold for another three to five seconds before returning to the starting position.
Step 3: Moving your head forward and then backward counts as one repetition. Try to perform 15 total repetitions.
Modifications: Can’t glide very far in either or both directions? Just glide as far as you comfortably can.
Why I Like It: I really like how gliding can limber up your neck, especially as you move it forward and back.
There’s no need to get out of bed cranky and cricked in the morning when you can perform these exercises to get ready for the day. I recommend performing them every day for optimal benefit, and I hope that they are beneficial for you.
About the fitness model: Aerowenn Hunter is a health editor and fitness model for The Epoch Times. Vibrant in her 60s, she’s an accredited yoga therapist who has dedicated three decades to teaching yoga.