When therapeutically walking patients, one of the most concerning issues we may encounter is knee buckling. These sharp, fast, unexpected knee flexions can be difficult to counter. Patients who can’t stop buckling may fall, and the heavier the patient, the harder it can be to counter buckling knees.
Knee buckling can be a symptom of muscular weakness—the focus of this article. Please note, however, that there can be other significant causes such as nerve conditions, patellar (knee cap) instability, torn menisci (cartilage) or anterior cruciate (ligament) injuries, medial collateral (ligament) injuries, and our perennial favorite, osteoarthritis. Notably, osteoarthritis, coupled with muscular weakness, is often the one-two punch that provokes falls.
When people perceive leg weakness and knee buckling, they often tend to avoid or reduce their activity levels to minimize the risk of falls and injuries. Weakness persists or worsens and activity decreases, increasing the risk of falls.
Let’s do something about it.
6 Knee-Strengthening Exercises to Help You Stand Firm
The following exercises can help you regain strength and mobility while reducing your risk of falls. They work well for my patients, but I recommend consulting with your medical provider to ensure that they are right for you.
1. Seated Knee Extension/Flexion
Let’s start with a high-mobility knee exercise to warm your knees, preparing them for the following, more intense exercises.
Step 1: Sit upright in a chair with your feet flat on the ground. Slowly extend your right knee until it’s completely straight and your foot is straight out. Next, slowly lower it back to the floor.
Step 2: Pull your foot backward under the chair until you move it back as far as you can. Return to the starting position.
Step 3: Lifting your foot out straight and then back counts as one repetition. Try to perform three sets of 20 repetitions per side. You can alternate between sides or perform all repetitions on one side and then the other.
Modifications: If you can’t straighten your knees completely, just move them as far as you can.
Why I like it: This is a simple yet effective warm-up exercise that prepares your knees for other resistance exercises.
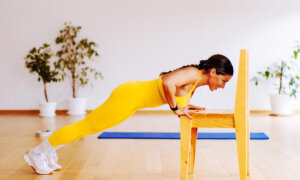
2. Counter Squats
Now that your knees are warmed up, let’s introduce more dedicated resistance training, with the counter squat being an excellent choice to start with.
Practice tip: When performing this exercise, use your legs to move into and out of squatting instead of overusing your arms.
Step 1: Stand in front of a counter or with your feet shoulder-width apart. I usually have patients stand in front of their kitchen sink because it offers excellent handholds, but you can use other counters or sturdy furniture as well. If you are not using a counter make sure that what you hold onto is secure—please note that the model for the exercise only had a lighter chair available in the studio setting.
Step 2: Slowly squat until your knees reach 90 degrees of flexion—or as far as you comfortably can. Be sure to sit back into the movement to prevent your knees from moving out in front of your toes.
Step 3: Return to standing, taking about two seconds. Slow is best with this exercise, as a slower speed doesn’t stress your knees and gives your muscles a better workout.
Step 4: Squatting down and then standing back up counts as one repetition. Try to perform three sets of 12 repetitions, adjusting sets and repetitions as needed.
Modifications: If you can’t move very far down, go only as far as you comfortably can. As you warm up, you should be able to do more.
Why I like it: The counter squat is controllable resistance training that’s easy to scale.
3. Tandem Chair Squats
Now, let’s up the ante on squats. Tandem chair squats focus heavily on one leg while still allowing the other leg to contribute.
Step 1: Sit at the front of your seat with your feet shoulder-width apart and your arms straight out in front of you. Slide your right foot slightly back while sliding your left foot slightly forward. The toes of the rearward foot should rest beside the heel of the forward foot.
Step 2: Lean forward and slowly stand up while lowering your arms to your sides. Reverse the movement by slowly lowering back down into sitting as you raise your arms to the starting position.
Step 3: Rising up and then sitting back down counts as one repetition. Try to perform four sets of 12 repetitions: 2 with your left foot in front and 2 with your right foot in front.
Modifications: If you can’t rise all the way up from the chair squat with your legs alone, you can perform the exercise from an armchair, which will allow you to use your arms for help.
Why I like it: Where the traditional chair squat is challenging but rather “all inclusive” for lower body musculature, the tandem chair squat focuses more heavily on the rearmost leg, adding an extra “kick” to the movement.
4. Banded Monster Walk
No, we’re not concerned with how banded monsters walk. Instead, we’re going to perform a continuous resistance exercise using elastic bands.
Step 1: In a standing position, place a tied length of elastic band (about 2 feet in diameter) around your ankles. Move your feet about two feet to three feet apart to place tension on the band.
Step 2: Initiate movement by walking forward, but instead of moving your feet straight forward, step out and forward as if walking around an obstacle. Be sure to maintain tension on the band as you do so.
Step 3: Performing this movement for one minute counts as one repetition. Try to perform three one-minute sets.
Modifications: You can perform the movement without resistance bands if using them is too challenging. You can also still use bands, but not move your feet so far apart.
Why I like it: The constant band resistance and side-to-side movements combine to make the banded monster walk highly effective.
5. Calf Raises
Now that we’ve focused on your thigh and gluteal muscles, let’s move to the calf muscles. Calf raises are a relevant exercise for preventing buckling because your gastrocnemius and soleus (calf) muscles provide knee stability and dynamic stabilization during functional movement.
Step 1: Stand with both feet on a yoga step, stair, or any other stable, elevated, level surface that allows you to suspend your heels, such as the edge of a porch. You want the balls of your feet on the step, with your heels hanging off the edge. Rise all the way up onto your tiptoes. It’s a good idea to have something stable, such as a wall or railing, for balance.
Step 2: Slowly lower your heels down as far as you can. Once there, move back up onto your tiptoes.
Step 3: Moving down as far as you can and then back up counts as one repetition. Try to perform three sets of 15 repetitions.
Modifications: If performing these exercises from a step is too challenging, rise onto your toes and then lower back down at ground level. Stand next to a supportive surface if you struggle to maintain your balance.
Why I like it: Calf raises provide an excellent, focused workout for your gastrocnemius and soleus muscles.
6. Supine Leg Raises
It’s time to transition from standing to lying down, but there’s still work to be done. Supine leg raises work on muscles involved with the knee and also engage your hip flexors.
Step 1: Lie on a firm, supportive surface, with your arms either by your sides or out to the sides if more comfortable.
Step 2: Slowly lift your right leg as far as you can with your knee straight. Once you reach as high as you comfortably can, slowly lower it back down. Lifting your leg up and then lowering it back down counts as one repetition.
Step 3: Try to perform three sets of 15 repetitions with each leg. You can alternate sides or complete all repetitions on one side before switching.
Modifications: Can’t move your legs up very far? Just move them up as far as you comfortably can. Want to increase the challenge? Try lifting both legs at the same time.
Why I like it: Stronger hip flexors help lift your feet off the ground, which can help you avoid toe catches and potential falls.
Together, these exercises can help address knee buckling due to muscular weakness. If you find that buckling persists, however, I highly recommend scheduling a visit with your medical provider to explore what may be causing the problem.
Remember, every significant knee buckle poses the risk of progressing into a fall and potential injury. Performing these exercises at least three times per week can help you avoid injury and maintain your best quality of life.
About the fitness model: Aerowenn Hunter is a health editor and fitness model for The Epoch Times. Vibrant in her 60s, she’s an accredited yoga therapist who has dedicated three decades to teaching yoga.